

You have just purchased your new bicycle from us, Congratulations! Now what do you need to know to keep it running well? Here is our guide, just for our customers.
Frames:
Your bike may be Aluminum, look for the welds where the tubes join. If this is the case, there is a few things you should be aware of:
Aluminum is a strong and light material and because it is a metal alloy, it will not rust. This is a perfect material for bikes because it can take punishment and will not damage easily, making for a really long lasting frame. Its also pretty much maintenance free.
If you do have an accident on your frame, it is by no means indestructible and a significant dent can still ruin the frames structural integrity. So if you have come off your bike and the frame looks damaged, please bring it in to us for inspection.
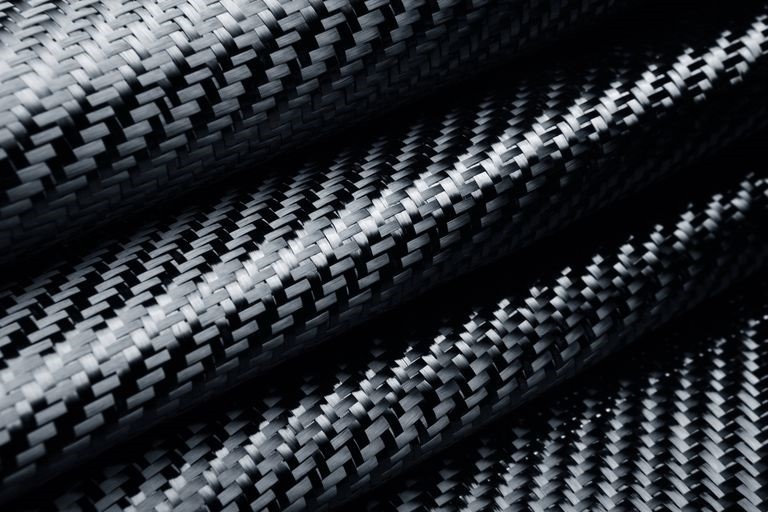
Your bike may be carbon, check for a frame without welds, especially check around the bottom bracket area. If this is your frame material, there are a few things you need to know:
Carbon is super stiff but also super compliant; meaning that it is one of the best bicycle materials on the planet; it can be compliant in one direction and stiff in another all depending on how the carbon is laid up and what sort of resin is used. It is also a very light material too.
What you should be aware of however, is that it doesn’t like big impacts or clamping forces. The sort of impacts we are talking about are usually one which would dent an aluminum frame, meaning its not much of a problem. However a small knock on carbon can extremely occasionally cause a crack internally, which may lead to a sudden failure. If you are worried, bring it to us and we will inspect for you. As long as you are careful with this frame material you won’t have any issues.
Clamping forces are most likely to affect a frame where you have to tighten a bolt to hold something in place; for instance where the seat post goes into the frame and where the stem clamps to the steerer tube. In these instances, using a torque wrench is of paramount importance, the maximum figures are usually displayed in NM on the seat clamp and the stem. These can vary on different frames from 3NM – 7NM, again if you are unsure, please do not hesitate to visit us in store.
Note that it is difficult to get paint finishes to bond to carbon in the way that it does to metal, so typically the paint finish is only guaranteed for a year. If you do get small stone chips in the finish it is best to seal them off with a drop of clear lacquer (even nail varnish would do!) to stop water getting under the paint and spreading.
–
Gearing:
Cross-Chaining:
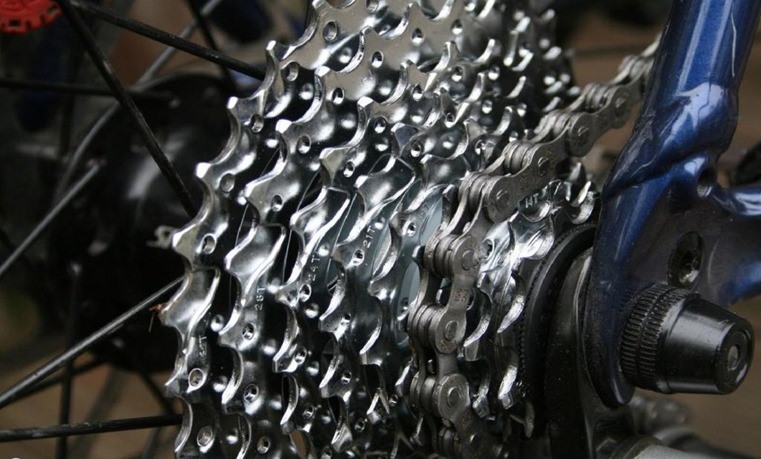
One thing that people always say to us is either: ‘My chain makes a lot of noise’ or ‘My gears have worn out really quickly’ these are both symptoms of cross chaining. This is where you are in the smallest cog at the front (the cranks) and the smallest cog at the back (rear wheel) OR the biggest cog at the front (the cranks) and the biggest cog at the back (rear wheel). This causes the chain to be at a very harsh angle and not in a straight line where there is the least amount of friction. When you are in these extremes of gears it will cause excessive wear, the chain may rub on the front derailleur (even whilst using micro-shift, see below) and it will be noisy.
To avoid this, simply shift the chain into the other ring at the front and go back up or down on the cassette. This will put the chain in a much better line.
It is also possible to wear out a single sprocket on the back of your bike if you always run in the same gear. Typically this is likely to happen if you always ride in the highest gear at the rear as there are only a few teeth in contact with the chain. It does your chain, gears and knees good to pedal in slightly lower gears and also to move through the gears to spread the load.
Cleaning a chain is one of the most important things you can do on a bike, as it will save you money in the long run. When you start to see grit on the chain, or if it is going black then you need to clean it. The best way to do this is to put a split link in your chain so you can remove it and bathe it in a degreaser, agitate with a brush, rinse through a sponge and then re-attach to a bike. The other option is to use a chain cleaner, which means the chain can remain on the bike.
This should get the chain back to silver and prolong its life. Just don’t forget to clean the cassette and the front chain rings at the same time, if not it is almost pointless.
We usually recommend a pour-on lubricant rather than a spray on as it is much more effective and won’t contaminate your brakes. When you apply the lube, you will need one drop on each roller bearing of the chain, top, and bottom. This then needs to be left to soak in for a few minutes and the excess should be wiped off with a rag, leaving a thin film behind. You don’t need to lubricate any other part of the chain and you don’t need lots of lubrication because this will just clog up the chain and attract more grit.
Another thing to note is rust. If your chain, or any metal part on your bike for that matter, gets wet and then isn’t dried down within a few hours, that part can rust. This process can even happen overnight. If the chain is correctly lubed and is dried down once wet, this should be easily avoided. Rust is not a sign of a bad chain, it’s a sign of poor maintenance.
Chain Wear:
A good quality chain will last from 1000-2500 miles, this fluctuates drastically depending on cross-chaining, chain maintenance, and conditions ridden in. You can come to us and we can check your chain with a chain wear checker or you can purchase one yourself. When this indicates the chain is 0.75% worn, you may be able to change your chain and keep the same cassette. If it indicates it is worn more than 1%, you will need a new chain and cassette, with the possibility of new chainrings too. This is because all the components work together and a new chain on a worn-out cassette will slip and not change efficiently. The newer you can keep your chain, the better. It’s better on your wallet to change a few times and keep the same cassette – rather than to have to change the chain and cassette every service.
Cables:
*Most bikes have gear cables and around 40% of them will have brake cables. These need very little maintenance but are of paramount importance in how a bike operates. Every few months, you should ideally spray or pour some lubrication down any visible cable point. On some internally routed frames, there aren’t that many points to lubricate, and on externally routes frames, this is a lot easier.
There is not much more you can do with cables apart from replacing them yearly (recommended) or removing the cable inners from their housing, completely re-greasing them, and then putting them back. But for the amount of time this takes and the in-expense of new cables, we always say you should replace them.
Micro-Shift:
Mostly found on Road Bike front derailleurs. This is where the front mech has two mini-shifts and two big shifts. This is built into the bike because when you are using the more extreme of gears (towards the cross-chaining end) the front mech is very thin and will mean the chain will start to rub without micro shift. This is a common thing we get in-store: ‘my gears are making a lot of noise’ this is not the setup, this is because they are not aware of the micro shift.
An example of this is if you are in the small ring at the front and you are starting to go towards the big ring at the back. You may hear the chain starting to make noise. With your front shifter, click it halfway toward the bigger ring shift. You should hear a small click, which will have moved the front mech about a millimeter. This is the same if you are in the big ring and when you are using the inboard (larger) end of the gear range.
This is not the easiest of concepts to grasp, so if you are still unsure, please pop in to us.
Shifting:
When shifting gears, you do not want to shift under load. This will cause lots of extra stress on the drive-train and could lead to chain snaps, which are not covered by warranty. The best practice for shifting is when you go to change gears, just back off the pedals slightly, but keep them turning and then shift. Once the gear has engaged, you can then apply pressure to the cranks again – think of it as putting the clutch in when you change gears in the car; you don’t switch the engine off, but you do cut the power to the gears/wheels. This is why changing gear going uphill is not advisable. Look after your gearing and it will look after you.
If your new bike has hub gears (you can tell this by the fact there is only one sprocket at the rear and a cable goes into the hub of the wheel for gear changes) you can change gear at any time whether pedaling or not but if you are under heavy load when you shift the gears will not change until you reduce the load on the drive train – again, don’t wait too late to change when going uphill!
Brakes:
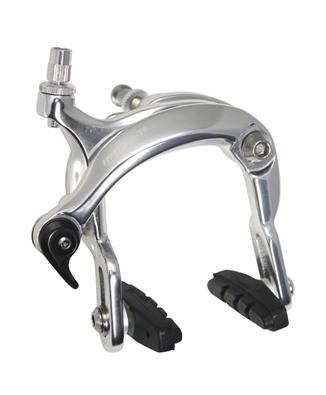
Caliper Brakes:
Usually found on road bikes, these brakes will stop well if they are maintained correctly. Make sure you avoid getting any form of lubrication on the braking surface as this will mean your braking is a lot less effective. If you find your brakes have become ‘looser’ and are not as tight as they use to be, there is a barrel adjuster where the cable goes into the caliper, which you can screw out slightly to pull them tighter again. This may also be needed as your pads wear down, however, if you bring it in for the recommended servicing, you will not need to adjust this yourself.
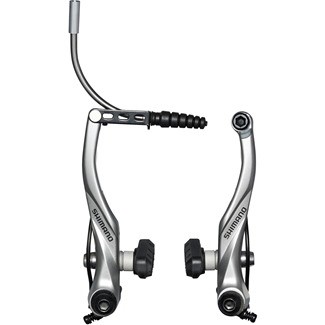
V-Brakes:
Usually found on Hybrid bikes and lower-end mountain bikes. These give you more clearance for tyres than caliper brakes but use the same principles. Don’t get lubrication on the braking surface as this will lead to your brakes not working as effectively. If you find your brakes have become ‘looser’ and are not as tight as they use to be, there is a barrel adjuster where the cable goes into the brake lever, which you can screw out slightly to pull them tighter again. This may also be needed as your pads wear down, however, if you bring it in for the recommended servicing, you will not need to adjust this yourself.
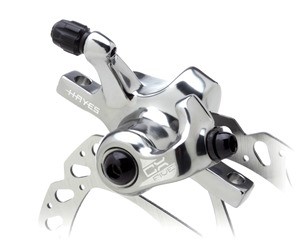
Mechanical Disc Brakes:
Usually found on various types of bikes at different price points.
You can tell if you have these because there will be a metal disc attached to the wheel and where the caliper is on the disc, you should spot a cable that moves when the brake lever is pulled. If you have this type, there are a few things you should take note of and need to keep on top of:
Keep all lubrication well away from the rotor, pads, and caliper. Disc brake pads are made of a material that will absorb oil if it comes into contact with it. The only way to rectify this if it does happen is to replace the pads and clean the rotor, which will cost you money. If this has happened you will hear a loud honking noise, if this noise does not go away in a ride, your pads are contaminated and will not work effectively.
In this braking system only one pad moves, which forced the disc onto a static pad (there are some which pull both sides). This means set up is crucial to good performance, which we will have done for you. However with this type of brake, the cable will stretch in quite rapidly within a few rides. If you find your brake lever is pulling back further than you like, there will be a barrel adjuster where the cable goes into the caliper. You can unscrew this slightly to bring the tension back in. But again, this is normally covered in regular servicing.
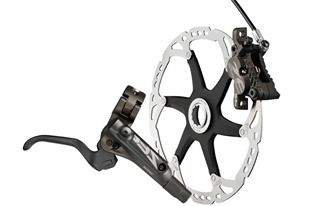
Hydraulic Disc Brakes:
Usually found on higher end Mountain bikes and Road bikes as well as hybrids. You can tell if you have these as there will be a metal disc attached to the wheel and no cable visible anywhere near the caliper or the entire braking system. Some of the things to note with this system are:
Keep all lubrication well away from the rotor, pads and caliper. Disc brake pads are made of a material which will absorb oil if it comes into contact with it. The only way to rectify this if it does happen is to replace the pads and clean the rotor, which will cost you money. If this has happened you will hear a loud honking noise, if this noise does not go away in a ride, your pads are contaminated and will not work effectively.
These brakes will not need adjusting in between services. They self-adjust when the pads wear down and should never leak (unless you are very unlucky). This is as they are a complete sealed unit from the caliper to the lever itself, so nothing can get in or out.
Hydraulics can vary with temperatures, so if you find your brakes have suddenly pumped up or pull closer to the bars, bring the bike into a normal temperature environment and pull the brakes a few times. If they do not return to normal, they may need a brake bleed. You will then need to bring this into us to do unless you are a very skilled mechanic.
Tyres:
Maintenance:
Inspecting your tyres is something people don’t usually do until they get a puncture. We recommend you check these every couple of weeks in bad conditions; you will be surprised how many bits of flint and debris you can pick out of a tyre in this time, many of which could eventually work there way through. In the dryer conditions, you needn’t worry as much, but is good practice to check them monthly. When checking your tyres, also look our for splits, tears, cuts and anything else that doesn’t look normal. These could all be signs that a new tyre is needed and maybe dangerous to ride on, it doesn’t hurt to be preventative.
You can also wear out your tyres, although these are generally quite hard wearing items. Tread Wear Indicators are generally displayed in every tyre. These look like little ‘holes’ in the tread itself. These are meant to be there just like on a car tyre. Make a note of where they are whilst your bike is new, then when you can no longer see them, you then know you need new tyres.
Pressures:
The Pressure you need to keep your tyres at is usually displayed on the side wall in PSI. This will generally be a range, the minimum of which should always be adhered to. This will require a track pump with a gauge on it to get the pressure high enough and correct. Sometimes your tyres may feel ‘hard enough’, but the likeliness is that they will be far below pressure. Always double check every few days.
It’s also worth noting that you shouldn’t go above the recommended pressures, this is the tyres rating not the inner tubes and may cause a blow out if the pressure is to high.
The pressure level you select in between the minimum and maximum is down to personal preference and riding terrain, feel free to ask for more advice.
Wheels:
Quick Releases & removing the wheels:
QR’s are the most common type of wheel release found on modern bikes, these are easily recognisable because there will be a lever on one side of the wheel where it meets the frame.
To undo these, simply pull on the lever and it will undo. You then need to hold the ‘nut’ on the opposite side of the wheel and the unscrew the lever side. Do this enough so that it can get past the dropouts. If it un-does completely, just screw the nut back on slightly, making sure you don’t loose the springs or put them on the wrong way round (these need to be bigger end facing the nut or lever, smaller end facing the frame).
Once it is loose and before removing the wheel, check if you need to back off your brakes to help get the tyre out. Disk brakes will not need adjusting, however rim brakes will, so look for a cam you can twist (on caliper brakes) or a guide you can pull out of (on v-brakes).
You should then be able to remove the wheel safely. Rear wheels are exactly the same as front wheels, except you will also need to get the chain out of the way. To make this easier, put the bike chain into the smallest cog on the front and smallest on the back using the gears, this will reduce the chain tension.
When replacing the wheel, put the wheel back in the bike, making sure it sits correctly in the drop outs. When the bike is the correct way up and the QR is loose, give the wheel a shake. This will make the wheel ‘self align’ in the frame meaning it will be in straight, then you need to do the QR up. Make sure this gets tight about half way through its travel and leaves and indentation on your hand when it is closed. Do not do this up against the frame as it will not close properly and you will not be able to get your hand underneath it to undo it again.
Through Axle:
There are many different types of thru axle, commonly found on higher end bikes. There are various ways to undo and do up these systems and if you are un-sure, please ask in store. Don’t try and force it as they can easily brake.
Bolted Axles:
These are commonly found of kids bikes. They are simple to undo by using a spanner and do up the same, just make sure the wheel is straight in the bike and you do each bolt up alternately to get an even fix.
Buckled rims:
Wheels are supposed to be true, and when you purchase a bike new they should always be that way. We check these as part of our build process to make sure you don’t have any issues.
The first few rides you may get a few noises from your spokes; which is completely normal, this is just the wheels are seating themselves and the spokes bedding in. What isn’t normal is getting a buckle. These usually occur from hitting a pot hole, a wheel not being built correctly or just from general miles. If you are a heavier rider, you are more likely to buckle your rims. If you notice a small movement in the wheels truth, just note it down for your next service, however if you notice a slightly bigger buckle, book it in a soon as possible to be straightened. If you keep riding this, it will make it worse and could lead to you needing a new wheel. Check all the spokes to see if they are even tensions, if you feel one that is noticeably loose, this may be the issue.
Once a wheel is buckled, we generally have to make the spokes un-even tensions to bring the rim straight again. A wheel always wants to get back to even tension, so this may keep happening more and more frequently until a new wheel is required.
Spoke Tension:
Spoke tensions can affect the stiffness of the rim as well as the comfort. These will always be set from the factory, and should never need altering. But if you are worried about this, mention it when you bring it in for the service and we can check that it is correct.
Also note that if you get a bent spoke it is not the end of the world! These spokes can take a lot of stress and are designed to be able to bend and keep their strength (think of a J-bend spoke). So if you see one, don’t worry too much. As long as the wheel is true, it shouldn’t let you down.
Wear lines:
All rims will come with wear indicators on the braking surface itself (disc brake variations won’t). These are designed to let you know when it is time to change your wheel. If you look after your wheels, you shouldn’t need to do this until about 10,000miles. To prevent premature wear, keep the braking surface clean as well as the brake pads. You will be able to hear if these are dirty and also see, with black grit forming as well as brake dust. If you look after these, they will look after you.
How to maintain:
Rims do not need much maintenance, however when you are cleaning your bike it is always good practice to clean your braking surfaces. Disc brake cleaner is usually the best product for doing this as it will not leave any substance behind which could affect your braking. Once this is done, check your spoke tension manually with your hands to make sure they feel equal. It is also good practice to lube your nipples, by this I mean where the spokes join the rim. Do this by pouring or spraying a little lube onto each. This will prevent them seizing, which could render the wheels un-trueable.
Hold the wheel by the axle and spin it between your hands, listen and feel for any graunchiness, this should feel smooth, if it doesn’t, you may need new hub bearings.
As long as these things are check regularly, you stand the best chance of your wheels having a long life.
Suspension:
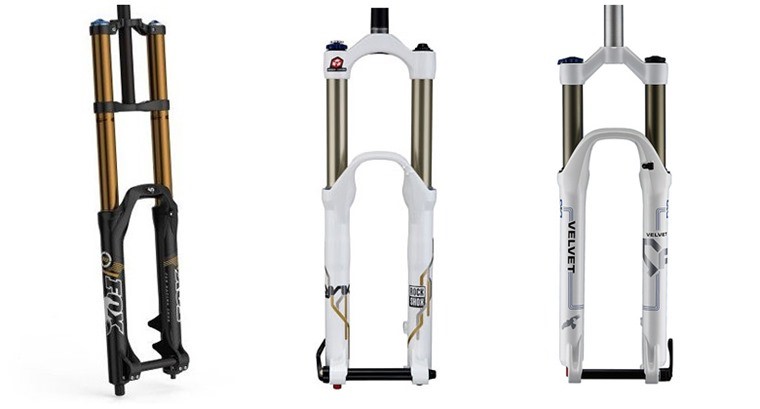
Rigid Fork:
This is as it says, a solid fork usually made of metal or carbon fiber. As long as you don’t hit these forks on anything or overtighten the stem to the steerer, you pretty much can’t go wrong.
Front Suspension:
Usually found on Mountain bikes and Dual Sport Hybrids. These are designed to absorb bumps and impacts from the front of your bike.
Depending on the quality of suspension, you may have any of the three adjustments below:
Compression:
Adjustable pre-load:
Usually recognisable by a twist dial that is found on the top of one of the fork legs. This will usually have a + and – on it, and will change how fast the suspension reacts when it is compressed (pushed downwards), + being stiffer and – being softer. If you want to get a feel for this, twist it completely one way then ride to see what it feels like, turn it completely in the other direction and you should be able to tell the difference. This pre-load adjust can be found on one or occasionally both of the fork legs.
Air Adjustment:
With this style of compression, there will be a un-screwable caps on one of the fork legs. This system is found on higher end suspension systems. When you completely un-screw this, it will reveal a Schrader (car type) valve, this can then be connected to a shock pump and the correct pressure added depending on rider weight. This may be on a chart on the back of the fork or may be on the fork manufacturers website. This pressure can drop over time, so will need to be checked on a regular basis.
Rebound:
Found underneath one of the for legs, usually recongnisable by a twistable dial or lever. Some suspension will have a bolt in its place, if you cannot twist this by hand it is not a rebound adjuster, so do not try to undo it.
Twisting the dial in one direction will make the rate the suspension returns to its normal position after being compressed quicker. Turning the dial in the other direction will make it react slower. Again try both variations to get a feel for the difference. This can be varied for the type of terrain you are riding on. Fast small bumps need faster re-bound, big jumps and rocks need a slower rebound.
Lock-out:
Some front forks come with a lockout lever. This is normally blue in colour and can only be twisted half a turn in either direction and is found on the top of the fork leg. You can also have a remote lock-out system where a cable will lead from the suspension to the handlebars (this will do the same job).
If you twist the lever to its locked position (indicated by a lock icon), this will make your suspension very stiff (although not completely solid). This setting will make you much faster on smooth surfaces such as the road, because you will not waste energy bouncing the bike up and down.
Now twist the lever to the fully un-locked position, this will mean it works as a normal suspension for off road use.
It is important to note that this is either on or off in most instances, so don’t be tempted to leave it in the middle unless it is stated to you upon purchase.
On all front suspension, you need to make sure that the sanctions (silver shafts that compress into the suspension) are wiped clean in order to assist the oil seals that prevent dirt getting into the suspension internals. This is all the maintenance you will need to carry out yourself, everything else will all ready be set up correctly from the shop, so there is very little you need to do.
If you are using your suspension for off road riding frequently, it is highly recommended that you get you fork serviced. This is separate to our normal servicing prices and makes sure your forks are working at their optimal.
Rear Suspension:
Rear suspension is generally only found on bikes over the £1000 mark with us and has all the same features as front suspension, we can go into more detail about this set up in-store as there are further variables that need to be taken into account and a few different types.
Specialized/Trek Innovations:
Specialized Future Shock (Roubaix and Ruby):
This is only on selected higher end models of the Specialized Road and Rigid fork Hybrid range. Set up will be mentioned to you in-store, but there isn’t much to know. You get different spring rates depending on the amount of dampening you want and you still have full stack height adjustment, this will just have to be carried out by one of our CyTech qualified mechanics.
Trek Iso-speed:
This innovation is only featured on selected trek models and will be pointed out to you during the hand over. This acts as a dampening system, in order to let your ride absorb more bumps. For more information, please contact the store.
E-Bikes:
Controls:
E-bikes generally have 3-5 different power modes on the control unit – From Eco to Turbo
–
Usage:
–
Battery/Motor Care:
The battery is a very important part of an E-bike, and is costly to replace (around £750) so caring for it correctly is very important.
Do not drop the battery; this could stop the battery working all together or affect its waterproofing, if you have and you are worried, get our in-store professionals to check it.
If the temperature where your E-bike is stored gets below 5 degrees, bring the battery inside with you. If not the amount of charge the battery can hold may be significantly affected. Similarly do not keep the batter at above 40 degrees.
Most E-bike Batteries will be fine for about 5000 re-charge cycles, so you never need to worry about needing a new battery in the life of the bike.
These batteries do not need to be completely de-charged before re-charging. Modern batteries prefer to be ‘topped up’ rather than drained completely.
–
Derestriction:
By-passing the limiter on any E-bike system is Illegal in the UK apart from private land use only. We as a company, do not condone the use of these chips and will not except any liability for the bike after this aftermarket item has been applied to a bike. We may agree to service the mechanical side of the bicycle, but will always note to the customer that it is illegal to use the bike anywhere other than private land. We cannot get the chips in for you, and always advise against it. If you do decide to de-restrict your bike, this voids all warranties with us, the manufacturer and means we can refuse any sort of service on the bike if we so choose.
These dongles make the bikes go past the 16mph limiter up-to 32 miles and hour plus. You can get this done legally in the UK, but you have to tax and insure your bike as a motorised vehicle and carry a driving license. How to do this will be on the governments website.
-
Safety:
–
During the summer months, it is not the law to have lights on a bike, but we recommend them. Day time running lights are now common place of cars and have been proven to make a vehicle more visible. So for a bicycle, having a very bright flashing rear light attracts attention and makes you safer; far more affective than any high vis gear. This is obviously down to personal preference, however it is different for when the sun goes down:
When the light is reduced, it is the law for a bicycle to have at least one front and rear light on the bike at all time. There are two different types of lights depending on their brightness: Lights used to be seen with, and those to see with. Anything under 150 lumens for a front light is considered to be a light to be seen with and only to be used in street lit conditions. Anything over this (trust me, the brighter the better) can then be used to actually see where you are going. Especially when there are no street lights and mountain biking.
About 400 lumens is normally a good balance of price and brightness. Having two lights front and rear on your bike is by far the best option to. Having one constant to see where you are going and one flashing means that you will differentiate yourself from a car/motorbike and drivers will take a lot more care.
Rear lights can range from 10 lumens – 100 lumens, generally 25 lumens + are plenty bright enough, but having one on the bike and one on your jacket or helmet is better so motorists can tell that your not just a motorbike.
Just make sure you always have them charged. There is no such thing as to visible, as long as you stick to the high way code.
–
Reflectivity:
Reflectors are the law, you are supposed to have a front and rear reflector, two orange pedal reflectors and at least one wheel reflector. All of our bikes will come with these applied (as well as a bell) or if not will be given to you free of charge with the bike. We recommend these stay on, but it is up to you in the end. If you have lights on the bike, you no longer need to have the reflectors in place.
High visibility clothing is always a good option, and will help you to be seen. There are lots of options in-store from all of our brands.
–
It’s – unfortunately – not the law to wear a helmet whilst riding a bicycle, but it is a must. Even an awkward hop off a curb can have disastrous consciences, and it will be the one time you think that you won’t need it, that you really will. We don’t want to scare monger you, but if you let loved one go without one, it will be you who will have to remember that choice. We will always wear one, even just around the block because the most skilled of riders can still be hit off. If you can’t get your kids to wear one, bring them into us and we will explain the risk, describe the incidents we have had where our helmets have saved our lives and also show them some crashed ones. Its worth the trip.
–
Road Guidance:
A lot of new cyclist don’t know how to ride there bikes in the correct manner on the road, knowing this could easily save lives and make both the motorists and the cyclists journey a lot more enjoyable.
Avoid riding in the gutter, the perfect place to be is about 1 1/2 ft out from the curb. This means that if a motorist is close to you there is somewhere to go, and they have to take more care when passing and not just squeeze through a gap.
Always check and signal before moving just as you would in a car.
You can ride two-a-breast in a larger group, but be courteous when you can be.
Always wave to a fellow cyclist!
–
Braking:
For the safest approach, you should think like a motorbike. Brake progressively with no sudden pulls and use both brakes at once. Braking is down to personal preference and whatever feels the easiest for you, but it is worth noting that the front brake will stop you far more efficiently than the rear and in the wet you need to allow a much further distance to stop.
Your brakes from new take time to bed in, so don’t worry if they are not the sharpest on the first few rides.
–
Security:
–
376,000 bikes are stolen each year. That is one every 90 seconds! So your going to need a good lock.
D-locks are the most secure but also weigh the most
Cable locks are the easiest to carry but the least secure
Chain locks can vary greatly, but are easily packable in a rucksack
The common traits for locks are generally with more security, comes more weight and bulkiness, there is no getting away from that fact.
Look for the Sold Secure Logo. These are how locks are independently tested for strength, Bronze taking 1 minute for a thief to get through, Silver 3 minutes and Gold 5 minutes. If a lock does not appear to have this rating, it is most likely more easy to brake into and would take under a minute.
Make sure you also remember that most bikes can be undone with your hands and an Alan-key set. So you will need a cable to go through the wheels at least in order to prevent just the frame being left.
–
Best practice:
Use your lock on a static, immovable object where there is no where for the lock to slide off of.
Put the lock through a solid part of your frame and the rear wheel too if possible.
–
Insurance:
Bike insurance is another way to put your mind at rest if you leave your bike locked up a lot of the time, for a bike of £500 value, this can cost just £4.50pm depending on the area you are in. This covers accidental damage and theft from within a vehicle etc. They also give you new for old prices for the first three years, so worth doing at least for then.
We use VeloLife insurance who are one of the best in the UK. Feel free to get an instant quote, just make sure you check their approved lock list, so you are always covered. With every brand-new bike, you will receive 10days free insurance when requested, VeloLife will then send you an automatic quote too.
–
Servicing:
–
Complimentary Tune ups for 2 years:
With every bike you purchase with us, you get up to 8 tune ups per year for 2 years absolutely free. This is because your cables will stretch in, your brakes may move slightly and some bolts will need checking. Don’t think of this as an opportunity to not clean or look after your bike, that is always your responsibility, we just make it as smooth and safe as possible. Also think of the things which you would like on your bike whilst riding in this period, we will fit most items free of charge too.
–
How often?
You should service your bike at least once a year. If you are using your bike more frequently (more than twice a week), then every six months is ideal. This will prevent things wearing to quickly and will save you an expensive bill in the long run. We can also give you maintenance advice if we see anything not as it should be.
–
What is carried out?
It all varies greatly depending on the level of service you select. These can all be seen HERE.
–
First Upgrades:
–
‘What’s the biggest performance boost I can get from an upgrade?’ That is the most common question we get asked, what’s our response? Clip in pedals and shoes.
The Shoe is the first bit you need, coming in two styles: Road and Mountain bike. Featuring a super stiff sole and with a tight fit, these assure that no power is lost though the shoe and it is all transferred from the foot to the pedal.
The pedals then come with the cleats that attach to your shoes and come in various different styles, brands, price points and weights.
The combination of both of these then means that you can attach yourself to your bike. You can then pull up and push down on your pedals; using different muscle groups and gaining in efficiency. This then leads to a 20% performance boost.
What are you waiting for?
–
If you want to feel the biggest difference from upgrading your bike, then wheels are the best place to start. Rotational weight savings are equivalent to saving around 4 times that on the frame alone, couple this with better bearings and better materials and you will notice a massive improvement.
You can also delve into the world of aerodynamics too, which can save you a huge amount of Watts.
–
Position:
The best upgrade for comfort or aerodynamics or both.
The lower and smaller you can get on the bike, the easier you can cut through the wind and the faster you will go. When the rider makes for over 80% of the rider bike package, how you sit on your bike is extremely important.
For comfort, you can get a slightly higher are more upright position, significantly reducing wrist and back pressure.
For either of these, please ask in-store for free advice.
–
–
Basic in store:
When you purchase your new bike from us, we will check that the saddle height is correct and that we have selected the correct size of bike for you. We may also do small adjustments to saddle position, stack height and stem length if we believe this is required.
–
Full Bike Fit:
This service is available from our Cycle Evolution store and our Specialized concept store in Chelmsford.
The process involves you spending around 4 hours with one of our fully trained fit specialists to get the most long-range comfort and performance your body can handle on your own bike. This is far more worth the money than any physical component purchase for the same value.
There are varying different options with this and varying prices. For all the relevant option, please click HERE.
–
Warranties:
Buying a bike from us means you’re getting a quality bike from a recognised brand with a great warranty in place to ensure that you get the most from your cycling experience.
The bike manufacturer will offer a warranty covering defects in manufacture, workmanship or design issues. They do not cover fair wear or tear of the bike in typical use.
–
Frames:
A lifetime frame guarantee is provided by most of our suppliers.
It should be noted that a direct replacement cannot be guaranteed if there is not stock available, which typically can be the case when a bike is some years old. There may therefore be consequential expense if different components are needed for the replacement offered.
–
Crash Replacement:
Some manufacturers offer crash replacement discounted frames for customers who have been involved in an accident. This is outside of the warranty and is at the discretion of the manufacturer and is only available to private purchasers not insurance replacements. If you have been in an incident with a motorist, we work with a company called CAMS who could help you recover the cost of damage and injury. Contact us to find out more.
–
Paint/Finish:
Paint and other finishes are normally covered for a year, but this is only for major failures such as large areas of flaking paint or significant discolouration. Small stone chips or scratches are considered fair wear and tear and as such are not covered.
Customers would be expected to keep their bike in good condition, store it in a suitable environment and to make good any minor chips/scratches etc. caused by normal use.
–
Components:
Most components from Shimano or SRAM are covered by a two-year warranty. This typically includes shifters, derailleurs, and brake components.
Fox and Rockshox are covered by a two-year guarantee, but this is also subject to you having maintained the unit in accordance with their regular servicing guidelines.
Specialized offer a 1 year bearing warranty, which is completely unique to just their brand.
–
E-Bikes:
The standard cycling components would be covered as for any normal bike dependent upon manufacturer, as described above.
For the electric elements, the general warranties are as follows…
Bosch Systems
The main electronics are covered for two years from purchase for non-commercial users. The battery is guaranteed for a minimum of 500 charging cycles or 70% of the nominal capacity within two years.
Yamaha Systems
The main electronics are covered for two years from purchase for non-commercial users. The battery is guaranteed for a minimum of 700 charging cycles within two years.
Shimano Steps Systems
A warranty of two years is provided for all Steps components.
Specialized Turbo Systems
The Turbo motor and electronics are covered for two years and the battery for 2 years or at least 75% capacity after 300 charge cycles.
Derestriction
If an e-bike is ‘chipped’ or ‘derestricted’ the manufacturer will consider that the bike has been subject to unauthorised modification and as such will have no warranty at all – not just for the electric systems.
–
Exclusions:
Warranties only apply to the original purchaser of a bike/component and would need to be supported by proof of purchase. Thomas’s cannot guarantee to be able to provide proof of purchase for bikes purchased from us as these are not held in perpetuity.
Generally, items that are considered ‘wearable’ or fair wear and tear are excluded from warranty.
This would include worn tyres, brake blocks, chain issues or bearings including suspension pivots and the bottom bracket. Different brands are more strict than others on this, for instance some brands will never cover bearings of any sort, whereas it can sometimes be possible to get items replaced as a gesture of goodwill if the issue is identified at or before the first service at 12 weeks (Specialized offer 1 year bearing warranty, the only brand to do this).
In particular punctures can happen anytime, even on the first ride of a bike so inner tubes are not covered under warranty, even if puncture protection is included in the tyre fitted to the bike.
Another explicit exclusion is the derailleur hanger (sometimes called a mech-hanger or drop out) which connects the rear derailleur to the frame. This is designed to fail if the derailleur contacts the rear wheel, in order to protect the frame. These items only fail if there has been damage or an impact to the rear gears and as such are not included in warranty, nor any damage to the gears that may result if the derailleur hanger does fail.
Accidental damage is not covered under warranty and also if the bike can be seen to have been inadequately maintained, has been misused or otherwise mistreated the manufacturer reserves the right not to provide warranty cover.
The warranty cover provided by manufacturers only extends to effected parts, not to consequential damage.
–
Labour to fit parts replaced under warranty:
For the first six months of ownership any parts fitted under warranty will be done so free of charge. After six months Cycle Revolution and all associated stores reserve the right to charge for fitment, even if the parts are being provided by the bike manufacturer free of charge.
Often it is necessary to return faulty parts to manufacturers. Any postage/shipping costs of returning and receiving items will be passed to the customer.
Cycle Revolution and associated stores can also support warranty claims for bikes or components purchased elsewhere but there may be additional costs for doing so.
–
IMPORTANT NOTE: This document is provided for information only and does not constitute a legally binding commitment to any coverage or otherwise of warranty issues. For clarification of any issues please contact Cycle Revolution.
—-
—-
This should of covered everything you should need to know about your bicycle – However if you would still like and help or information, please contact us here
Happy Riding!
The Cycle Revolution Team


